eDocs Home > BEA AquaLogic Data Services Platform Documentation > Data Services Developer's Guide > Contents
How To Create a Data Service with a Flat Return Type
This topic shows you how to create an update map from a logical data service with a flat, non-nested return type, using the sample database that ships with AquaLogic Data Services Platform.
Overview
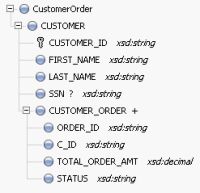
A return type can be non-nested, or flat, even if it joins two relational tables, where one table has a one-to-many relationship with the other table . An example is one customer in a CUSTOMER table with many Orders in an ORDERS table. One approach to the return type is to nest an Orders element of multiple cardinality beneath the Customer element.
A Nested Customer-and-Orders Schema
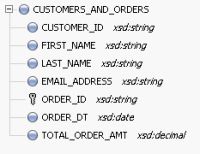
Because you can design a logical data service with any structure, regardless of the underlying data sources, it is just as valid to define a flat return type to model the relationship between Customers and Orders.
A Flat Customer-and-Orders Schema
Create a Dataspace Project
First, create a new dataspace project to contain your physical and logical data services:
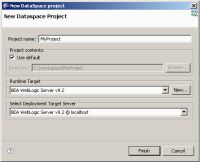
- In Studio, choose File > New > Dataspace Project.
- Enter a project name such as FlatReturnType, then click Finish.
- Right-click the new dataspace project name, and choose New > Folder.
- Create folders named physical and logical. Within logical, create a folder named schemas.
Using separate folders for physical and logical services helps separate the physical and logical integration layers.
Adding a New Dataspace Project
Create the Return Type
The return type the logical data service uses combines data from the CUSTOMER table and the ORDERS table. It has a non-nested XML structure, even though the data shows that customers and orders have a one-to-many relationship.
You can define the return type by creating an XML schema (XSD) file. In an XML editor, create a schema file like this one:
<?xml version="1.0" encoding="UTF-8" ?>
<xs:schema targetNamespace="ld:logical/FlatReturnType" xmlns:xs="http://www.w3.org/2001/XMLSchema">
   <xs:element name="CUSTOMERS_AND_ORDERS">
      <xs:complexType>
         <xs:sequence>
            <xs:element name="CUSTOMER_ID" type="xs:string"/>
            <xs:element name="FIRST_NAME" type="xs:string"/>
            <xs:element name="LAST_NAME" type="xs:string"/>
            <xs:element name="EMAIL_ADDRESS" type="xs:string"/>
            <xs:element name="ORDER_ID" type="xs:string"/>
            <xs:element name="ORDER_DT" type="xs:date"/>
            <xs:element name="TOTAL_ORDER_AMT" type="xs:decimal"/>
         </xs:sequence>
      </xs:complexType>
   </xs:element>
</xs:schema>
Be sure to:
- Define targetNamespace to make sense for your dataspace project.
Make sure you have only one top-level element of the name you choose (here, CUSTOMERORDER) in your target namespace. You can give the targetNamespace the same name as the dataspace project, but you are not required to. - Save the schema file in the logical/schemas folder within your dataspace project.
Note that the cardinality of all elements uses the default values, minOccurs="1" and maxOccurs="1". Each customer has many orders, but there is only one combination of customer and order, so the cardinality of the order elements (ORDER_ID, ORDER_DT, and TOTAL_ORDER_AMT) is still 1.
Create Physical Data Services
Now, create physical data services based on the sample database or your own physical data sources.
- In Project Explorer, right-click the physical folder in your dataspace project.
- Choose New > Physical Data Service.
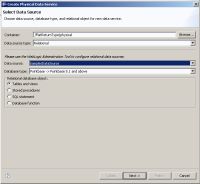
- Choose Relational for Data source type and dspSamplesDataSource for Data source, then click Next.
- Expand RTLCUSTOMER and select CUSTOMER.
- Expand RTLAPPLOMS and select CUSTOMER_ORDER, then click Next.
- Select Public for both CUSTOMER and CUSTOMER_ORDER, then click Next.
- Click Finish.
- When asked if you want to open the new data services, click No.
Adding Physical Data Services
Create a Logical Data Service
Now that you have physical data services and a schema for the return type, you can create the logical data service.
- Right-click the logical folder, then choose New > Logical Data Service.
- Enter a name for the service, such as FlatCustomersAndOrders.
- Make sure Entity Data Service is selected, then click Finish.
Now associate a return type with the service:
- Right-click in the Overview tab and choose Associate XML Type.
- Select the schema and click OK.
A New Logical Data Service with a Return Type
You also need to define a primary Read function, in order to create both the query map and update map.
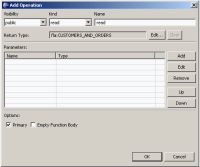
- Right-click in the service name bar at the top, and choose Add Operation.
- Make sure Kind is set to read, then enter a function name, such as read.
- Make sure Primary is selected, then click OK.
Creating a Primary Read Function
Create the Query Map
Now you need to create the query map visually in Studio, which in turn generates an update map.
- Click the Query Map tab.
- In Project Explorer, expand the physical data services CUSTOMER.ds and CUSTOMER_ORDER.ds.
- Drag the Read function -- like this:
 -- from each physical service to the mapping area.
Notice that you cannot scope the CUSTOMER_ORDER block to a subtype in the return type, because the return type has no subtypes. - Drag mappings from the CUSTOMER block on the left to the return type for CUSTOMER_ID, FIRST_NAME, LAST_NAME, and EMAIL_ADDRESS.
- Drag mappings from the CUSTOMER_ORDER block on the left to the return type for ORDER_ID, ORDER_DT, and TOTAL_ORDER_AMT.
- In the For blocks, drag from CUSTOMER/CUSTOMER_ID to CUSTOMER_ORDER/CUSTOMER_ID.
This creates a join between the two data sources.
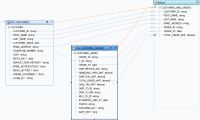
At this point, the query map looks like this. You can see the mappings to the return type, as well as the join (the dotted line) between CUSTOMER and CUSTOMER_ORDER.
A Query Map with Mappings and a Join
If you click the Source tab and expand the Read function, you see XQuery code like this:
declare function tns:read() as element(fla:CUSTOMERS_AND_ORDERS)*{
for $CUSTOMER_ORDER in cus1:CUSTOMER_ORDER()
for $CUSTOMER in cus:CUSTOMER()
where $CUSTOMER/CUSTOMER_ID eq $CUSTOMER_ORDER/C_ID
return
        <fla:CUSTOMERS_AND_ORDERS>
            <CUSTOMER_ID>{fn:data($CUSTOMER/CUSTOMER_ID)}</CUSTOMER_ID>
            <FIRST_NAME>{fn:data($CUSTOMER/FIRST_NAME)}</FIRST_NAME>
            <LAST_NAME>{fn:data($CUSTOMER/LAST_NAME)}</LAST_NAME>
            <EMAIL_ADDRESS>{fn:data($CUSTOMER/EMAIL_ADDRESS)}</EMAIL_ADDRESS>
            <ORDER_ID>{fn:data($CUSTOMER_ORDER/ORDER_ID)}</ORDER_ID>
            <ORDER_DT>{fn:data($CUSTOMER_ORDER/ORDER_DT)}</ORDER_DT>
            <TOTAL_ORDER_AMT>{fn:data($CUSTOMER_ORDER/TOTAL_ORDER_AMT)}</TOTAL_ORDER_AMT>
        </fla:CUSTOMERS_AND_ORDERS>

};
Notice that the XQuery code has a for statement nested directly within another for statement. This creates an inner join between the two tables in SQL. To confirm the SQL that is created:
- Click the Test tab.
- At Select operation, make sure the primary Read function is selected.
- Click Run (saving your data service as necessary).
You should see an XQuery FLWOR statement node. If you expand it, you should see a SQL query like this, showing an inner join:
SELECT t1."ORDER_DT" AS c1, t1."ORDER_ID" AS c2, t1."TOTAL_ORDER_AMT" AS c3,
  t2."CUSTOMER_ID" AS c4, t2."EMAIL_ADDRESS" AS c5, t2."FIRST_NAME" AS c6, t2."LAST_NAME" AS c7
FROM "RTLAPPLOMS"."CUSTOMER_ORDER" t1
JOIN "RTLCUSTOMER"."CUSTOMER" t2
ON (t2."CUSTOMER_ID" = t1."C_ID"
The inner join is created because the logical data service has a flat return type. When you mouse over the SQL query, you see this message:
Generated SQL query does not have a WHERE clause. This may cause the query to take longer to finish and use excessive memory resources.
